How to Prevent Bruising After GLP-1 Injections
Bruising from GLP-1 injections, like Ozempic, is uncommon but can happen when tiny blood vessels under the skin are damaged. Most bruises heal on their own within 7–14 days, but proper techniques and care can reduce the risk. Here’s what you need to know:
- Causes: Improper injection techniques, reusing needles, injecting near sensitive areas (e.g., close to the belly button), or individual factors like thin skin, blood-thinning medications, or anemia.
- Prevention Tips:
- Use a fresh needle for every injection.
- Rotate injection sites (e.g., abdomen, thighs, back of the arms) to avoid repeated trauma.
- Inject at a 90-degree angle and avoid bruised or scarred areas.
- Let the alcohol swab air dry before injecting to prevent irritation.
- Warm medication to room temperature for 15–30 minutes before use.
- Aftercare:
- Apply firm pressure (not rubbing) to the injection site for 10–20 seconds.
- Use a cold compress to reduce swelling and bleeding.
- Avoid strenuous activity targeting the injection area for a few hours.
Step-by-Step Guide to Prevent Bruising from GLP-1 Injections
How to avoid injection site reactions with Mounjaro or Ozempic & when are they serious?
Why Bruising Happens After GLP-1 Injections
Bruising after GLP-1 injections happens when the needle damages tiny capillaries under the skin. This causes blood to leak into the surrounding tissue, resulting in visible discoloration. Let’s break down the factors that can increase the likelihood of bruising.
Common Causes of Bruising
Several factors can make bruising more likely, including injection technique, site selection, equipment condition, and individual health factors.
Injection Technique: Using improper technique is a frequent cause of bruising. For example, injecting at an angle, moving the needle too quickly, or hesitating during the injection can damage tissue and blood vessels. A slanted injection angle increases the distance the needle travels, raising the chance of hitting a capillary.
Site Selection: Where you inject matters. Injecting within two inches of your belly button increases the risk of bruising because this area has more blood vessels. Similarly, injecting into warm skin – like after a hot shower or following physical activity – brings blood vessels closer to the surface, making them easier to damage.
Equipment Condition: Reusing needles can also contribute to bruising. Over time, needles become dull and may develop small imperfections, which can tear tissue instead of piercing it cleanly. This causes more trauma to the injection site.
Individual Health Factors: Your health plays a role too. If you take blood-thinning medications like warfarin or aspirin, your blood may clot more slowly, making even minor vessel injuries result in larger bruises. Additionally, people with thin or fair skin, older adults, or those with clotting disorders are often more prone to bruising.
"People who suffer from anemia or low iron bruise much more easily. Your body needs iron to keep your blood cells oxygenated and healthy." – Christine Fallabel, MPH, Diabetes Strong
By understanding these factors, you can better manage and potentially reduce bruising when using GLP-1 medications.
How GLP-1 Medications Work
GLP-1 receptor agonists, such as Semaglutide and Tirzepatide, mimic a natural hormone that helps regulate blood sugar and appetite. These medications are protein-based, so they need to be injected into the subcutaneous fat layer – the soft tissue between the skin and muscle. If taken orally, they would break down in the digestive system and lose effectiveness.
The subcutaneous fat layer ensures the medication is absorbed slowly and steadily, allowing it to work as intended over time. Injecting too deeply can speed up absorption, which may increase the risk of hypoglycemia. On the other hand, injecting too shallowly may prevent proper delivery of the medication and could irritate the injection site.
Selecting the Best Injection Site
When it comes to reducing bruising and ensuring your GLP-1 medication works effectively, where you inject matters. The right injection site can make all the difference by targeting areas with enough fat and fewer blood vessels.
Best Areas for Injections
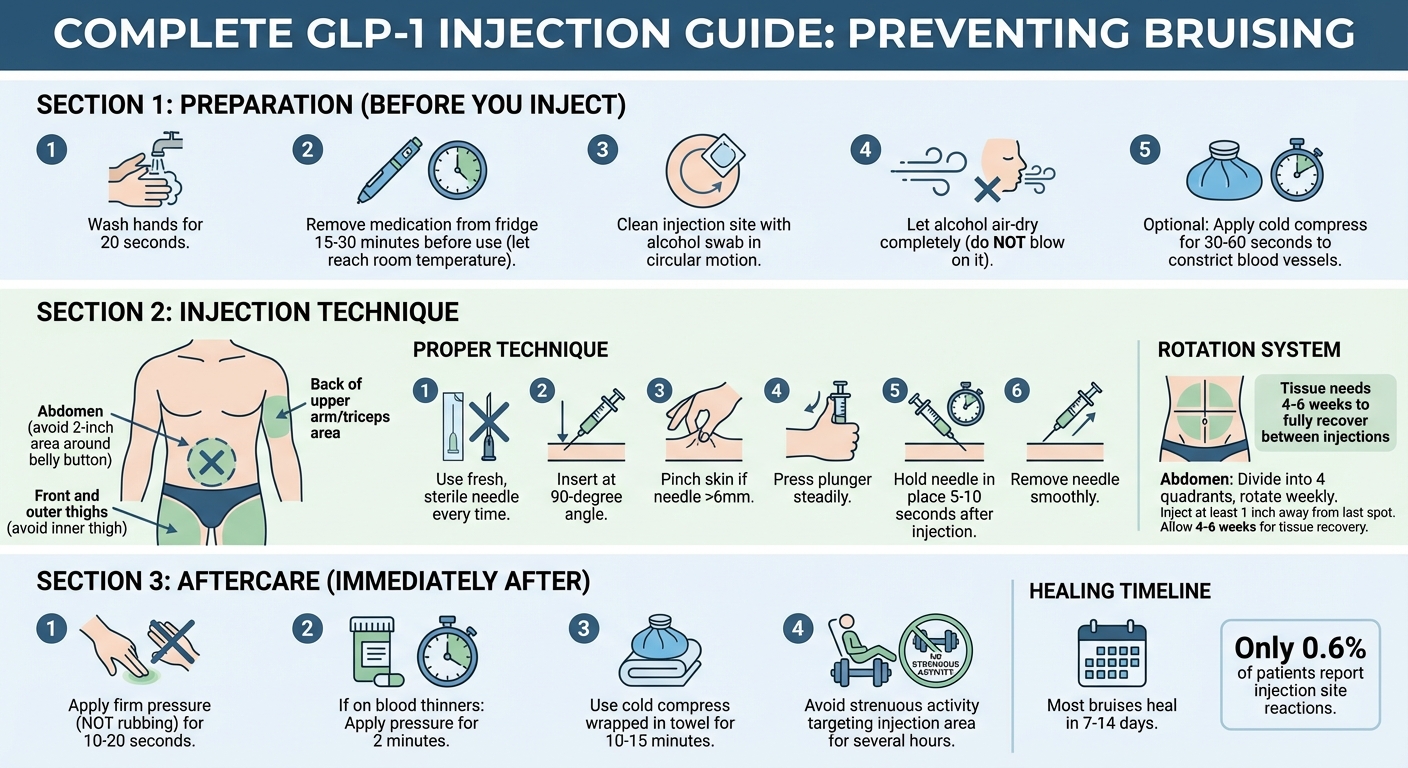
- Abdomen: This is often the go-to spot because it provides a broad, even layer of fat for reliable absorption. However, steer clear of the 2-inch area around your belly button, as it has a higher concentration of blood vessels.
- Front and outer thighs: These areas are another solid choice. They’re easy to access and generally safe, but avoid the inner thigh to reduce the risk of hitting sensitive tissue.
- Back of your upper arm: Specifically, the triceps area (about 3 inches above the elbow and below the shoulder). While it’s a viable option, you might need a mirror or someone’s help to ensure a proper 90-degree angle for the injection.
"Certain areas of the body, like the abdomen or thigh (common injection sites), may be more prone to bruising due to blood vessel density or tissue sensitivity." – Dr. David Garcia, DO, Founder, Polaris Rejuvenation
Rotating Between Injection Sites
Switching up your injection spots regularly is key to avoiding issues like tissue damage and bruising. Repeatedly using the same area can lead to lipohypertrophy, which are firm, rubbery lumps under the skin. These lumps can take months to heal and may interfere with how your body absorbs the medication, impacting its effectiveness.
For the abdomen, consider a quadrant system: divide it into four sections (top right, top left, bottom right, bottom left) and rotate through them weekly. Always inject at least 1 inch away from your last spot to give the tissue enough time – about 4 to 6 weeks – to recover.
If you’re using your thighs or arms, alternate between the left and right sides every other week. To keep track, use a simple log or body map to avoid accidentally injecting into the same spot too soon.
Once you’ve chosen and rotated your injection sites, the next step is perfecting your injection technique to further reduce the chances of bruising.
Correct Injection Technique
Getting your injection technique right is essential to minimize bruising. The way you handle the needle and deliver the medication can make all the difference in reducing this common issue.
How to Inject Safely
Start by washing your hands thoroughly. Check the medication’s Beyond Use Date (BUD) and ensure the liquid is clear and colorless – if it’s cloudy or discolored, don’t use it. Clean the injection site with an alcohol swab and allow it to air dry completely before proceeding. This step helps prevent stinging and lowers the risk of infection.
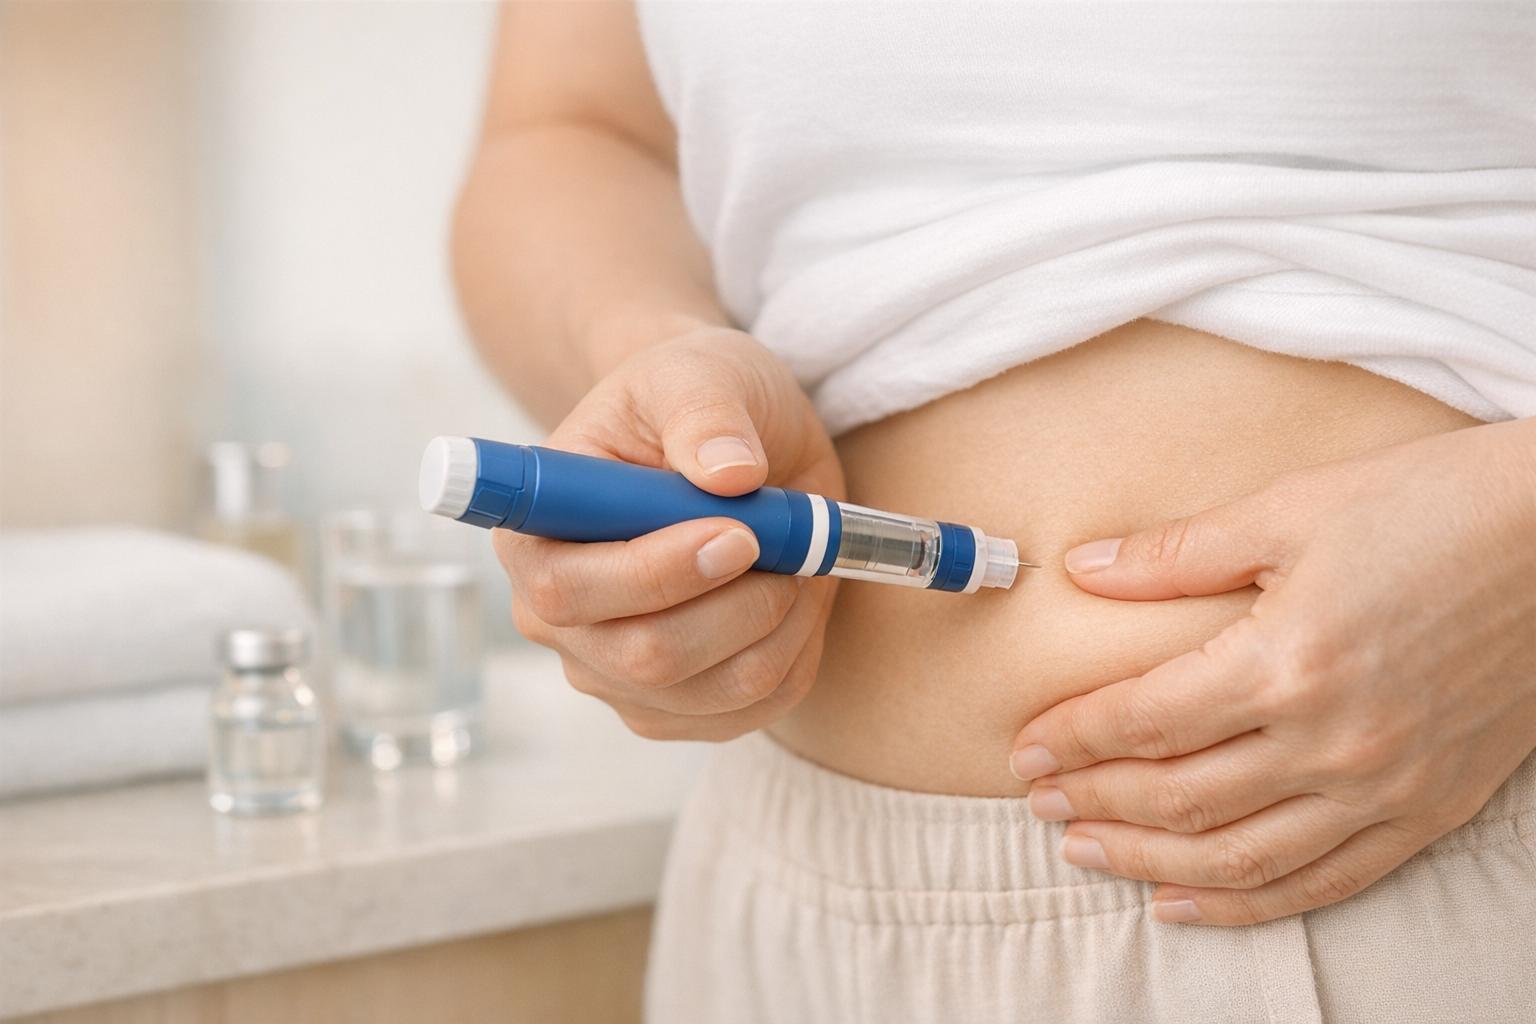
Hold the syringe securely and insert the needle at a 90-degree angle directly into your skin. This ensures the medication reaches the subcutaneous fat layer rather than the muscle or skin surface. If you’re using a needle longer than 6 mm, pinch about an inch of skin to create a fold – this helps keep the needle in the fatty tissue. For shorter needles (4-5 mm), pinching may not be necessary.
Once the needle is fully inserted, press the plunger down steadily. After injecting, hold the needle in place for 5 to 10 seconds before removing it. This pause ensures the full dose is delivered and prevents medication from leaking back out, which can irritate your skin and increase bruising.
After withdrawal, apply firm but gentle pressure to the injection site using a clean finger or gauze for 10 to 20 seconds. Avoid rubbing the area, as this can spread blood under the skin and worsen bruising. As Slim Transformation explains: "Rubbing spreads the blood, enlarging the bruise, so simply press and wait." Following these steps can help ensure a smoother, safer injection process.
Mistakes to Avoid
Let’s go over some common mistakes that can increase the risk of bruising and discomfort.
- Don’t reuse needles. Even a single reuse dulls the needle, making it more likely to tear tissue instead of piercing cleanly. This increases pain and bruising. Always use a fresh, sterile needle for every injection and dispose of it immediately in a sharps container – never recap it.
- Avoid injecting cold medication. Medication straight from the refrigerator can cause more discomfort and irritate the tissue. Take it out 15 to 30 minutes before your injection to let it warm to room temperature.
- Stay away from sensitive areas. Avoid injecting into bruised, scarred, red, or tender spots. Also, keep at least 2 inches away from your belly button, where blood vessels are more concentrated.
- Watch for resistance. If you feel strong resistance while inserting the needle, you might be hitting muscle. Stop immediately and adjust your angle. Injecting into muscle can lead to faster absorption, more bleeding, and side effects like nausea. The Diabetes Council advises: "Injecting into the muscle directly can hurt and it also increases your chance of developing hypoglycemia due to the faster absorption rate."
Preparing for Your Injection
Getting ready for your injection the right way can make a big difference in minimizing discomfort and bruising. A little preparation goes a long way in ensuring the process is as smooth as possible.
Cleaning the Injection Area
Start by washing your hands thoroughly with soap and water for at least 20 seconds. Once your hands are clean, grab an alcohol swab and gently clean the injection site using circular motions, about the size of a silver dollar. This step disinfects the area effectively and prevents bacteria from spreading.
Allow the alcohol to air-dry completely before proceeding. This helps avoid skin irritation or unnecessary tissue trauma. And remember, don’t blow on the area – it can reintroduce bacteria.
"Let the skin air-dry; blowing or fanning can re-introduce bacteria."
Injecting into wet skin can increase stinging and the chance of bruising. Additionally, wipe the rubber stopper on your medication vial with an alcohol swab before drawing your dose to maintain cleanliness.
If you’re worried about bruising, applying a cold compress or ice pack to the injection site for 30 to 60 seconds before injecting can help. The cold constricts small blood vessels, reducing the chances of bleeding.
With the area disinfected and prepped, you’re ready to move on to preparing your medication.
Bringing Medication to Room Temperature
Once your injection site is ready, make sure your medication is too.
Injecting cold medication straight from the fridge can cause a sharp stinging sensation and increase tissue irritation, which may lead to more bruising. To avoid this, take your medication out of the refrigerator about 30 minutes before injecting. This allows it to reach room temperature naturally.
Never use external heat sources like microwaves or hot water to warm the medication. Before injecting, check the liquid to ensure it’s clear and colorless. If you notice any cloudiness or discoloration, do not use it.
sbb-itb-e2779c3
Aftercare to Reduce Bruising
Taking care of the injection site right after the procedure can go a long way in preventing bruising. A few simple steps can make a noticeable difference.
Applying Light Pressure
The moment you remove the needle, gently press the area with a clean finger, cotton ball, or gauze. Hold this pressure for 10 to 20 seconds to stop blood from pooling beneath the skin, which is the main cause of most bruises.
"NICE and NHS training both reinforce that pressure – not massage – is best for keeping marks small." – Slim Transformation
For those who bruise easily or take aspirin, it’s a good idea to extend the pressure time to 2 minutes. If you’re on blood thinners like warfarin or other anticoagulants, firm pressure for at least 2 minutes is crucial to avoid larger bruises.
Once you’ve applied pressure, use a cold compress wrapped in a clean towel for 10 to 15 minutes. The cold helps narrow blood vessels and minimizes minor bleeding. Be sure not to place ice directly on your skin – always use a barrier like a towel. Also, avoid rubbing or massaging the area, as this can cause blood to spread into surrounding tissue, making the bruise worse.
Limiting Physical Activity
After caring for the injection site, it’s important to take it easy for a while. Avoid strenuous activities that target the area for the first few hours. Increased blood flow from exercise can make bruising worse and irritate the site.
For example, if you injected into your abdomen, skip core exercises for the rest of the day. If the injection was in your thigh, hold off on leg-intensive workouts. Bruises from injections usually fade within 7–14 days, and giving the area a break can help keep them smaller.
Risk Factors That Increase Bruising
Bruising after GLP-1 injections isn’t just about technique or injection site – it can also be influenced by individual risk factors like medications and overall health. Let’s break it down.
Medications and Supplements That Affect Bruising
Certain medications and supplements can increase your chances of bruising. For example, anticoagulants (like warfarin, apixaban, or dabigatran) and antiplatelet drugs (such as clopidogrel or aspirin) are known to raise bruising risk. After your injection, pressing firmly on the site for at least two minutes can help minimize this.
Even over-the-counter pain relievers can play a role. NSAIDs like ibuprofen (Advil, Motrin) and naproxen (Aleve) can interfere with platelet function. If your doctor approves, you might consider avoiding these medications for about five days before your injection. Similarly, some herbal supplements – like fish oil, high-dose Vitamin E, garlic, ginkgo biloba, and St. John’s Wort – have blood-thinning effects. Stopping these at least two weeks before starting injections may reduce your risk of bruising.
Diet and lifestyle habits can also make a difference. Alcohol, along with foods like avocados, garlic, ginger, and turmeric, can thin your blood. To reduce bruising, you may want to avoid alcohol for 5–7 days before and the evening after your injection.
While managing these factors, it’s also important to consider how your skin and overall health might contribute.
Skin and Health Conditions
Your skin and general health can significantly impact how easily you bruise. Thin or fragile skin, which is more common in older adults or in those who’ve used corticosteroids for extended periods, is more prone to capillary damage. Additionally, people with fair skin may notice bruises more because their blood vessels are closer to the surface, making discoloration more visible.
Underlying health issues can also play a role. For instance, anemia or iron deficiency can weaken blood cell function, making bruising more likely. Boosting your iron intake with foods such as beans, lentils, tofu, and dark leafy greens could help. If needed, consult your doctor about taking supplements to address deficiencies.
For those with blood disorders like thrombocytopenia (low platelet count) or von Willebrand disease, bruising risks are significantly higher. If you have one of these conditions, you’ll need to take extra precautions during injections and work closely with your healthcare provider to manage your care.
How TrimRX Supports Your Weight Loss Goals

TrimRX takes the complexity out of GLP-1 medication programs, addressing challenges like bruising while simplifying weight loss management. By offering personalized plans tailored to your health needs, TrimRX ensures a program that aligns with your goals and lifestyle.
Customized Programs for Your Needs
TrimRX creates individualized weight loss plans using GLP-1 receptor agonist medications, including Semaglutide, Tirzepatide, Mounjaro, Wegovy, and Ozempic. During your first consultation, healthcare professionals review your medical history, current medications, and potential risk factors. This ensures your treatment plan, including dosing schedules and injection guidance, is tailored specifically to you.
Whether you need injectable or oral medication, TrimRX works with you to determine the best option. The personalization doesn’t stop there – it includes ongoing clinical support and seamless access to your prescribed medications.
Full Support and Convenient Delivery
TrimRX provides comprehensive support to ensure safe and effective use of your medication. Their guidance covers proper injection techniques, site rotation, and aftercare tips to help minimize bruising. Plus, you’ll have unlimited access to medical professionals for any questions or concerns, making the process as smooth as possible.
With free delivery, your medications arrive directly at your doorstep, carefully packaged and ready to use. This service not only saves you trips to the pharmacy but also allows you to let the medication reach room temperature before injecting – a simple step that can enhance comfort and reduce the chance of bruising.
Conclusion
Bruising after GLP-1 injections can often be avoided with a few simple steps. Start by using a fresh, sterile needle for every injection. Rotate your injection sites by at least an inch to give your skin time to heal. Applying firm pressure for 10–20 seconds after injecting and warming the medication to room temperature for 15–30 minutes before use can also help reduce the likelihood of bruising.
"Understanding why bruising occurs, how to minimize it through correct injection technique, and when to seek medical advice can help patients manage this side effect confidently and maintain treatment adherence." – Bolt Pharmacy
These techniques have shown positive results in clinical practice. For example, in Ozempic trials, only 0.6% of patients on the 0.5 mg dose reported injection site reactions like bruising, and most cases resolved within a week or two.
Practicing proper injection techniques not only protects your skin but also ensures the medication is absorbed effectively. Injecting at a 90-degree angle into the fatty subcutaneous layer and consistently rotating injection sites helps prevent scar tissue buildup, which could interfere with medication absorption. These small adjustments can make a big difference in comfort and treatment success.
"Good technique and consistent practice make treatment safer and more comfortable." – SlimTransformation
FAQs
How can I choose the best injection site to reduce bruising?
To reduce the chances of bruising after GLP-1 injections, pick areas with plenty of fatty tissue, like your abdomen, upper thighs, or the outer part of your upper arms. Stay away from spots with visible veins, scars, stretch marks, tattoos, or any irritated skin, as these areas are more likely to bruise. Rotate your injection sites each week, and keep proper spacing – at least 2 inches from your belly button and 1 inch from any previous injection spots.
Before injecting, gently pinch the skin to check that the area feels soft and has enough subcutaneous fat. Always use a new needle and insert it at a 90° angle to avoid hitting muscle or causing tissue damage. Following these steps can make the process smoother and help prevent bruising.
How do health conditions or medications increase the risk of bruising after GLP-1 injections?
Certain health conditions and medications can increase the likelihood of bruising after a GLP-1 injection. For instance, blood-thinning medications like aspirin, ibuprofen, or warfarin can disrupt normal clotting, making bruises more noticeable. Additionally, drinking alcohol within 24 hours of an injection may raise the risk by interfering with blood clotting.
Some conditions, such as anemia or other blood disorders, can also contribute to bruising by weakening blood vessels or impairing clotting. Individuals with thin or aging skin may notice bruising more often, as their skin offers less protection for the delicate blood vessels underneath.
To minimize bruising, practice proper injection techniques: rotate your injection sites, always use a fresh needle, and apply gentle pressure to the area afterward. If bruising becomes frequent or severe, it’s a good idea to consult your healthcare provider for tailored advice.
Why should I let the alcohol swab dry before giving a GLP-1 injection?
Allowing the alcohol swab to dry completely before an injection is more important than you might think. If the alcohol hasn’t evaporated, it can cause a sharp stinging sensation, irritate the skin, and might even dilute the medication being administered. Injecting into damp skin can also heighten the chances of bruising or infection – two things you’d definitely want to avoid.
Quick tip: Once you’ve swabbed the area, give it about 5–10 seconds to fully dry before moving forward with the injection. A little patience here goes a long way!
Related Blog Posts
Transforming Lives, One Step at a Time
Keep reading

Mons Pubis Fat Loss on GLP-1s: The “Pubic Area” Change Nobody Mentions
One change that surprises people on GLP-1 medications rarely comes up in conversation: the mons pubis, the soft fat pad over the pubic bone,…

How to Adjust Weight Loss Goals on GLP-1 Medications
Adjust weight goals on GLP-1 meds by tracking body composition and labs, optimizing protein, activity, sleep, and working with your provider on dosing.
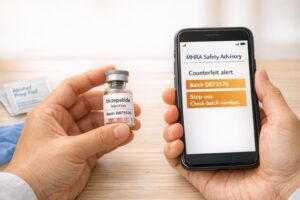
Falsified Mounjaro pens prompt urgent safety advisory
MHRA warns of counterfeit Mounjaro pens (batch D873576); stop use and check batch numbers for infection risk.

