Where to Inject Ozempic: Best Sites and Rotation Guide
You’re ready to take your weekly Ozempic dose, pen in hand, but you’re staring at your stomach wondering exactly where you should inject. Is there a best spot? Does location affect how well the medication works? What happens if you keep using the same area week after week?
Here’s what you need to know: Ozempic can be safely injected in three areas of your body: your abdomen (stomach), thigh, or upper arm. Each site has specific advantages, and proper rotation between locations prevents tissue damage while ensuring consistent medication absorption. The abdomen is typically the easiest and most comfortable for self-injection, but understanding all three options gives you flexibility to rotate sites effectively and manage any localized issues that might develop.
This guide provides complete information about injection site selection, detailed instructions for each body area, rotation strategies that prevent complications, and troubleshooting for common site-related problems. By the end, you’ll know exactly where to inject, how to rotate systematically, and what to watch for at injection sites.
Key Takeaways: Ozempic Injection Sites
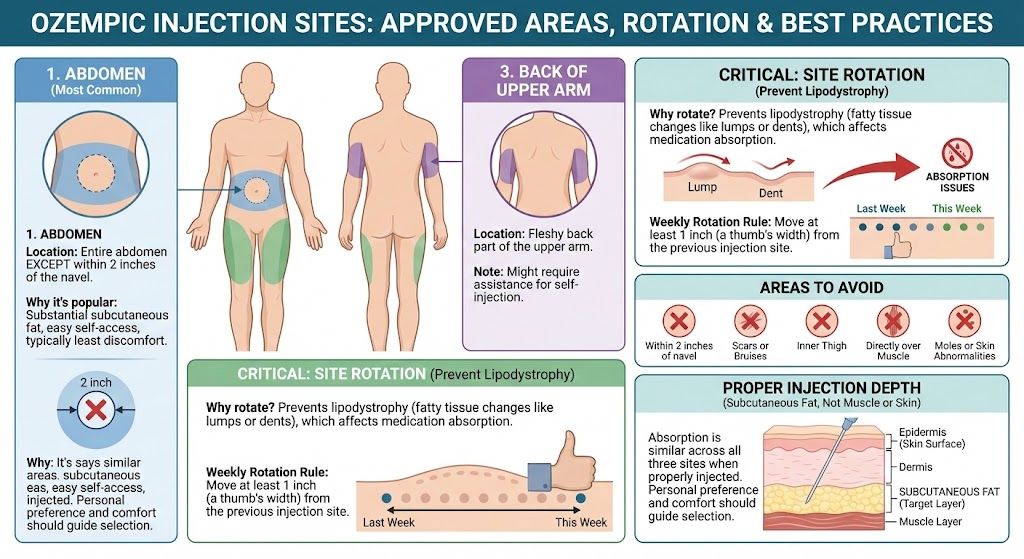
- The three FDA-approved injection sites for Ozempic are the abdomen (except within 2 inches of the navel), the front or outer thigh, and the back of the upper arm.
- The abdomen is most commonly used because it has substantial subcutaneous fat, is easy to access for self-injection, and typically causes the least discomfort.
- Site rotation is essential to prevent lipodystrophy, a condition where fatty tissue changes structure and can affect medication absorption and cause visible lumps or dents.
- You should move your injection site at least 1 inch (about a thumb’s width) from your previous injection location each week.
- Absorption rates are similar across all three sites when properly injected into subcutaneous tissue, making personal preference and comfort the main selection factors.
- Areas to avoid include within 2 inches of your belly button, any location with scars or bruises, the inner thigh, directly over muscles, and areas with moles or skin abnormalities.
- You don’t need to switch between different body regions each week, but you must change the specific location within a region to prevent tissue damage.
- Proper injection depth matters more than location: Ozempic should go into subcutaneous fat, not muscle or skin layers, regardless of which site you choose.
Understanding Subcutaneous Injection Sites
Before diving into specific locations, it’s important to understand what makes a good injection site for Ozempic and how subcutaneous injections differ from other types.
What Subcutaneous Means
Ozempic is administered subcutaneously, meaning you inject it into the layer of fatty tissue between your skin and muscle. This isn’t the same as an intramuscular injection (which goes deep into muscle tissue) or an intradermal injection (which goes just below the skin surface into the dermis layer).
The subcutaneous layer, also called the hypodermis or subcutis, consists primarily of fat cells and connective tissue. This layer serves as insulation and energy storage for your body. It also contains relatively few nerve endings compared to skin or muscle, which is why properly placed subcutaneous injections cause minimal discomfort.
For medication purposes, the subcutaneous layer provides slow, steady absorption into the bloodstream. Ozempic is designed to be released gradually from this tissue over the week between doses, maintaining consistent semaglutide levels in your system.
Why Site Selection Matters
The thickness and distribution of subcutaneous fat varies across different body areas. Some locations have more substantial fat layers that make injection easier and more comfortable. Areas with thinner fat layers might result in accidentally injecting into muscle (too deep) or just under the skin (too shallow), both of which can affect absorption and comfort.
Site selection also impacts convenience. Some areas are easy to reach and see for self-injection, while others require awkward positioning or assistance from someone else. The best injection site is one that has adequate subcutaneous fat, is easy to access, and remains comfortable with repeated use.
Absorption Considerations
Research shows that absorption rates of semaglutide are similar across approved injection sites when properly administered into subcutaneous tissue. This means the medication works equally well whether you inject in your abdomen, thigh, or upper arm, as long as you’re reaching the correct tissue layer.
Minor variations in absorption speed can occur based on factors like blood flow to the area, the thickness of fat tissue, and your activity level. However, these differences are generally not clinically significant for weekly medications like Ozempic. The medication’s long half-life and weekly dosing schedule mean that small variations in absorption timing don’t meaningfully impact effectiveness.
The Abdomen: Most Popular Injection Site
The abdomen is the most commonly recommended and used injection site for Ozempic. For most people, it offers the ideal combination of accessibility, comfort, and adequate subcutaneous tissue.
Exact Location on the Abdomen
You can inject anywhere on your stomach area except within 2 inches of your belly button (navel). Imagine drawing a circle with a 2-inch radius around your navel. The entire area outside that circle, from just below your ribcage down to your pubic area and extending to your sides, is appropriate for injection.
Most people have the most subcutaneous fat in the lower abdomen, roughly halfway between the navel and the pubic area, extending to each side. This area tends to be most comfortable for injection and has plenty of space for rotating injection sites over many weeks.
The upper abdomen, between your navel and ribcage, also works well and may have more fat in some individuals. The sides of your abdomen (sometimes called the “love handle” area) provide additional injection sites with substantial fat tissue.
Why the Abdomen Works Well
The abdominal area offers several advantages. It typically has a substantial layer of subcutaneous fat, even in relatively lean individuals. This makes it easier to ensure you’re injecting into the correct tissue layer rather than accidentally going too deep into muscle.
The abdomen is easy to see and access for self-injection. You don’t need to twist your body into uncomfortable positions or use mirrors to view the injection site. You can clearly see what you’re doing throughout the injection process.
Most people report that abdominal injections cause less discomfort than other sites. The area has relatively fewer nerve endings in the subcutaneous layer, and the fat provides cushioning that minimizes the sensation of needle insertion.
The large surface area of the abdomen provides many different spots for rotation. You can easily move your injection location around this region week after week without running out of fresh sites.
Abdominal Injection Technique
Stand or sit in a comfortable position that allows you to see your abdomen clearly. Choose your injection site, staying at least 2 inches from your navel and 1 inch from your last injection location.
Clean the area with an alcohol wipe using circular motions. Let it air dry completely. Avoid touching the cleaned area before injection.
You don’t need to pinch the skin on your abdomen for injection unless you’re very lean with minimal fat. Most people can simply hold the pen at a 90-degree angle to their skin and insert the needle straight in. If you’re uncertain about your fat layer thickness, gently pinching an inch of skin and injecting into that pinched area ensures subcutaneous placement.
Insert the needle fully, press and hold the dose button, wait for the count to reach 0, then count to 6 before removing the needle. Our complete injection guide covers the full injection process in detail.
Abdominal Areas to Avoid
Stay at least 2 inches away from your belly button in all directions. The navel area has different tissue structure and less subcutaneous fat, making it inappropriate for injection.
Avoid any areas with scars from previous surgeries. Scar tissue affects medication absorption and can make injections more uncomfortable. If you have an abdominal scar (like from a C-section or appendectomy), inject well away from it.
Don’t inject over the bony protrusions of your hip bones or ribcage. These areas have minimal subcutaneous fat, increasing the chance of painful injection into muscle or bone contact with the needle.
Skip any areas with moles, skin abnormalities, bruises, rashes, or signs of irritation. Let these heal completely before considering that area for injection.

The Thigh: Accessible Alternative Site
The thigh provides an excellent alternative to abdominal injection, especially for people who have abdominal tenderness, surgical scars on their stomach, or simply want to rotate to a completely different body region.
Exact Location on the Thigh
Inject into the front or outer (side) part of your thigh, roughly in the middle section between your knee and hip. If you divide your thigh into thirds from hip to knee, the middle third is ideal. The upper third works as well, though you want to stay a few inches below where your thigh meets your hip.
The front of the thigh (where you can see when looking down) and the outer side of the thigh both work well. The outer thigh often has more subcutaneous fat and may be more comfortable for some people.
You have two thighs, effectively doubling your rotation options. Your left thigh and right thigh count as separate injection sites for rotation purposes.
Why the Thigh Works Well
Like the abdomen, the thigh typically has substantial subcutaneous fat tissue, especially on the front and outer areas. The thigh is easy to access while sitting, making it convenient for injection.
Some people prefer the thigh because they find it easier to relax the area compared to the abdomen. Tensed muscles make injections more uncomfortable, and it’s often easier to keep thigh muscles relaxed while sitting than to keep abdominal muscles relaxed.
The thigh provides a change of location if you experience tenderness or irritation in your abdominal injection sites. Rotating between completely different body regions gives each area more recovery time between injections.
Thigh Injection Technique
Sit comfortably in a chair with your leg relaxed. Choose your injection site on the front or outer thigh, avoiding the inner thigh area. Make sure you’re injecting into the middle or upper-middle section of your thigh, not too close to your knee.
Clean the site with an alcohol wipe and let it dry. Most people don’t need to pinch the thigh skin before injection, but if you’re quite lean or want extra assurance of subcutaneous placement, gently pinch an inch of skin and inject into that area.
Insert the needle at a 90-degree angle, press and hold the dose button, wait through the count, then count to 6 before removing the needle. The technique is identical to abdominal injection, just in a different location.
Thigh Areas to Avoid
Never inject into the inner thigh. This area has more nerve endings, major blood vessels, and less subcutaneous fat. Inner thigh injections tend to be more painful and have higher risk of hitting blood vessels.
Avoid the area directly over your kneecap and several inches above it. This region has minimal fat tissue, and the needle could contact bone or inject into the joint area.
Don’t inject into the back of your thigh. This area is difficult to access for self-injection, and it has less consistent subcutaneous fat distribution. The back of the thigh also contains major nerves and blood vessels that are better avoided.
Skip areas where clothing waistbands or belts sit if they cause friction or pressure. Repeated pressure over injection sites can cause irritation and affect medication absorption.
Thigh vs Abdomen: When to Choose Thigh
Some people simply prefer the thigh and use it as their primary site. Others rotate between abdomen and thigh, perhaps alternating weeks or months between the two regions.
Consider using your thigh if you have extensive abdominal scarring, if you find abdominal injection psychologically difficult, if you’re experiencing tenderness in your abdominal sites that needs recovery time, or if you want maximum rotation between completely different body regions.
Some individuals find the thigh slightly more sensitive than the abdomen, while others experience the opposite. Personal variation is significant, so experimentation can help you determine which site works best for your body.
The Upper Arm: Less Common but Effective
The upper arm is the least commonly used injection site for Ozempic, primarily because it’s difficult to reach for self-injection. However, it’s a perfectly acceptable site that some people use successfully.
Exact Location on the Upper Arm
Inject into the back or outer area of your upper arm, roughly halfway between your shoulder and elbow. If you reach your right arm across your body to touch your left upper arm, the area you naturally touch (the back/outer part of the upper arm) is the injection zone.
The fatty tissue in this area is often less substantial than on the abdomen or thigh, but most people have adequate subcutaneous fat for proper injection. Very lean individuals with minimal upper arm fat might find this site challenging.
Why the Upper Arm Is Challenging
The main limitation of the upper arm is accessibility. It’s difficult to reach behind your own arm to inject, requiring awkward positioning. You often can’t see the injection site clearly while injecting, which some people find uncomfortable.
Many people who use the upper arm site have someone else administer their injection. If a family member, friend, or healthcare provider is giving you the injection, the upper arm becomes much more practical.
The upper arm typically has less subcutaneous fat than the abdomen or thigh, making it easier to accidentally inject too shallow or too deep. Proper technique is especially important with this site.
Upper Arm Injection Technique
If self-injecting, use your opposite hand to reach across your body to the back of your upper arm. This is the most natural position, though it still requires flexibility and coordination.
Some people find it helpful to use a mirror to see the injection site when using their upper arm. Others learn to inject by feel after a few attempts.
If someone else is administering your injection, they should stand or sit behind or beside you, with clear access to the back of your upper arm. The person helping should follow all the same steps: clean with alcohol, let dry, insert needle at 90 degrees, press dose button, count to 6.
Given the smaller fat layer in many people’s upper arms, pinching the skin before injection is often recommended. Pinch an inch of skin, insert the needle into the pinched area, and release the pinch once the needle is inserted (or keep holding it through injection, either way works).
Upper Arm Areas to Avoid
Don’t inject into the front (inner) part of your upper arm where you can see it when looking down. This area has less fat and more nerve and vascular structures.
Avoid the very top of your upper arm near the shoulder joint and the lower part near the elbow. Focus on the middle section of the back/outer upper arm.
Don’t inject directly over the upper arm bone (humerus) or into areas where you can’t grasp at least a half-inch of fat tissue.
When the Upper Arm Works Well
Despite its challenges, some people prefer the upper arm. If you have someone to help with injections regularly, the upper arm is perfectly reasonable. Some people also develop techniques for self-injecting in this area that work well for them.
The upper arm can be useful if you have issues with both abdominal and thigh sites simultaneously. Having three different body regions available provides more flexibility for managing any localized problems that develop.
Athletes or people who do activities that cause abdominal or thigh irritation (like cycling or running) sometimes prefer the upper arm because it’s less affected by these activities.
Site Rotation: Why It’s Essential
Injecting in the same spot repeatedly causes several problems that proper rotation prevents.
Understanding Lipodystrophy
Lipodystrophy is the medical term for abnormal fat tissue changes caused by repeated injections in the same area. This condition takes two forms: lipohypertrophy (thickening of fat tissue creating lumps) and lipoatrophy (thinning or loss of fat tissue creating dents or depressions).
Lipohypertrophy appears as firm lumps under the skin where fat cells have multiplied abnormally in response to repeated insulin or GLP-1 injection. These lumps can be cosmetically concerning and, more importantly, they affect how medication is absorbed. Injecting into areas with lipohypertrophy leads to unpredictable, often reduced medication absorption.
Lipoatrophy appears as visible indentations in the skin where fat tissue has been lost. This is less common with modern medications than with older insulin formulations, but it can still occur with repeated injection in the exact same spot.
Both forms of lipodystrophy are largely preventable through proper site rotation. Once developed, these tissue changes can be difficult to reverse, though they often improve slowly over months to years if you stop injecting in those areas.
How Rotation Prevents Problems
Rotating injection sites gives each area time to heal between injections. A single injection causes minimal trauma to tissue. The issue arises with repeated trauma to the same spot week after week.
By moving at least 1 inch from your previous injection site, you spread the minor tissue trauma across a larger area. Each spot gets multiple weeks of recovery time before being used again.
Proper rotation also ensures consistent medication absorption. Fresh tissue absorbs medication predictably. Damaged or changed tissue (from repeated injection) may absorb medication at different rates, potentially affecting your results.
Developing a Rotation System
The simplest rotation system involves dividing your chosen injection region into quadrants or sections, then systematically rotating through them.
For abdominal rotation, imagine dividing your stomach into four quadrants: upper right, upper left, lower right, lower left (all staying at least 2 inches from your navel). Inject in a different quadrant each week:
- Week 1: Lower right abdomen
- Week 2: Lower left abdomen
- Week 3: Upper right abdomen
- Week 4: Upper left abdomen
- Week 5: Return to lower right, but a different spot within that quadrant
This simple system ensures you never use the same area two weeks in a row, giving each spot at least three weeks of recovery.
Some people prefer a clockwise rotation pattern, starting at one location and moving systematically around their injection area. Others use a more random approach, simply ensuring each new injection is at least 1 inch from the last.
Tracking Your Rotation
Many people find it helpful to keep a simple log of injection sites, especially when starting treatment. You might note “left lower abdomen” or “right thigh” with each weekly dose. After a few weeks, you’ll likely develop an intuitive sense of rotation without needing to track formally.
Some people take a photo of each injection site (before injecting) as a visual record of their rotation pattern. This helps you remember where you injected last week.
Smartphone apps for medication tracking often include features for logging injection sites. These can send reminders and help you visualize your rotation pattern over time.
The key is finding a tracking method that you’ll actually use consistently. Even a simple note in your phone calendar noting “left abdomen” or “right thigh” with each weekly dose helps prevent accidentally using the same spot repeatedly.
When to Switch Body Regions
You don’t need to rotate between different body regions (like switching from abdomen to thigh to arm) unless you want to. Many people successfully use just their abdomen for all injections, rotating locations within that region.
However, rotating between different body regions provides even more recovery time for each area and can be helpful if you develop any localized issues. Some people rotate monthly: four weeks of abdominal injections in various spots, then four weeks of thigh injections in various spots, then back to the abdomen.
Others prefer staying within one region for consistency and convenience. There’s no medical requirement to switch between body regions as long as you’re rotating specific locations within a region adequately.
Comparing Injection Sites: Which Is Best?
The “best” injection site varies by individual, but understanding how sites compare helps you make informed decisions.
Comfort and Pain
For most people, the abdomen causes the least injection discomfort, followed by the thigh, with the upper arm typically being slightly more sensitive. However, individual variation is significant. Some people find the thigh most comfortable or notice no difference between sites.
The perception of pain also changes with practice. Your first injections in any site tend to cause more anxiety and perceived discomfort than later injections as you become accustomed to the process.
Proper technique affects comfort more than site selection. Injecting cold medication straight from the refrigerator, injecting through wet alcohol, tensing muscles during injection, or inserting the needle hesitantly all increase discomfort regardless of site.
Convenience and Accessibility
The abdomen wins for convenience in most cases. It’s easy to access, easy to see, and requires no assistance. You can inject standing, sitting, or lying down with equal ease.
The thigh ranks second for convenience. It’s accessible for self-injection and easy to see while sitting. Some people find sitting more comfortable than standing for their weekly injection, making the thigh preferable despite the abdomen being objectively easier to reach.
The upper arm ranks last for convenience due to the awkward reach required and difficulty seeing the injection site. Most people who regularly use the upper arm have someone to assist.
Absorption Consistency
All three sites provide similar absorption when medication is properly injected into subcutaneous tissue. Clinical studies haven’t shown meaningful differences in semaglutide effectiveness based on injection site.
Very minor differences in absorption speed might exist due to varying blood flow in different body areas, but semaglutide’s long half-life and weekly dosing mean these theoretical differences don’t impact results.
Consistent injection technique matters more than site selection for reliable absorption. Proper depth (subcutaneous, not intramuscular or too shallow) ensures medication reaches the correct tissue layer regardless of body location.
Fat Layer Thickness
The abdomen typically has the most substantial subcutaneous fat layer in the majority of adults, including those who are relatively lean. This makes ensuring proper injection depth easier.
The thigh usually has good subcutaneous fat, especially on the front and outer areas, though this varies more by individual body composition than abdominal fat does.
The upper arm often has the least subcutaneous fat of the three approved sites. Very lean individuals might find adequate fat layer thickness challenging in the upper arm.
People with obesity typically have substantial subcutaneous fat at all three sites, making any location appropriate. Very lean individuals should focus on sites where they can clearly pinch at least a half-inch of fat tissue.
Practical Recommendations
Start with the abdomen for your first several injections. The ease of access and visualization helps build confidence. Once you’re comfortable with the injection process, you might experiment with the thigh to see how it compares.
Use rotation within a single region (like just the abdomen) if that works well for you and you’re consistently moving the specific injection location. Add additional body regions if you experience localized tenderness, run out of fresh spots, or simply want maximum rotation time for each area.
Reserve the upper arm for situations where you have regular assistance or if you develop problems with both the abdomen and thigh simultaneously.
Special Considerations for Different Body Types
Body composition affects injection site selection and technique.
Higher Body Weight
People with substantial subcutaneous fat typically have excellent options at all three injection sites. The primary considerations are choosing areas that are comfortable to access and ensuring proper needle insertion despite thicker fat layers.
Standard Ozempic pen needles (4mm to 6mm length) work well for most people regardless of body weight. The needles are designed to reach subcutaneous tissue without going too deep into muscle.
The large surface area of subcutaneous fat in people with higher body weight provides extensive room for rotation. You can space injections generously apart, using many different locations before needing to return to any specific spot.
Lower Body Weight or Lean Builds
Lean individuals with minimal body fat need to select injection sites more carefully. The abdomen still usually has adequate subcutaneous fat, even in quite lean people. Focus on the lower abdomen where fat tends to concentrate.
When injecting with minimal subcutaneous fat, pinching the skin before injection becomes more important. Pinch an inch of skin, insert the needle into that pinched area, and you’ll ensure subcutaneous rather than intramuscular injection.
If you’re very lean and having difficulty finding adequate subcutaneous fat at any site, discuss this with your healthcare provider. They might recommend different needle lengths or injection techniques specific to your body composition.
Pregnancy and Postpartum Considerations
Ozempic is contraindicated during pregnancy due to potential fetal harm, so you shouldn’t be injecting if you’re pregnant or planning to become pregnant soon. Our guide to Ozempic and pregnancy covers this topic comprehensively.
For postpartum individuals who have medical clearance to resume Ozempic (and are not breastfeeding, as safety during breastfeeding hasn’t been established), the abdomen remains the best injection site despite any changes from pregnancy. Abdominal skin changes, stretch marks, or diastasis recti don’t prevent safe injection as long as you’re reaching subcutaneous fat.
C-section scars should be avoided, injecting several inches away from the scar line. The scar tissue affects medication absorption and can make injection more uncomfortable.
Surgical Scars and Previous Procedures
Any surgical scar should be avoided for injection. Scar tissue has different structure than normal subcutaneous tissue, potentially affecting medication absorption. Scars can also be more sensitive to injection pain.
Stay at least 2 inches from any scar, more if the scar is raised or if you have extensive scarring. People with multiple abdominal surgeries might need to rely more heavily on thigh injections if abdominal scarring is extensive.
Cosmetic procedures like liposuction affect subcutaneous fat distribution in treated areas. If you’ve had liposuction in typical injection areas, discuss appropriate sites with your healthcare provider, as treated areas might have reduced or altered subcutaneous tissue.
Common Injection Site Mistakes
Avoiding these common errors ensures better results and more comfortable injections.
Using the Same Spot Repeatedly
The most common mistake is injecting in the same location week after week. Even if you’re using “different spots,” if those spots are within a half-inch of each other, you’re not rotating adequately.
Make sure you’re moving at least 1 inch (a full thumb width) from your previous injection site. Better yet, move 2 to 3 inches, giving tissues even more recovery time.
Injecting Through Clothing
Never inject through clothing. This introduces contamination risk and may prevent proper needle insertion depth. Always inject into clean, bare skin that you’ve prepared with an alcohol wipe.
The minor inconvenience of exposing your injection site is worthwhile for safety and effectiveness.
Ignoring Signs of Lipodystrophy
If you notice lumps, bumps, or indentations forming at injection sites, stop using those areas immediately. These are signs of developing lipodystrophy. Give those areas several months of rest while rotating to other locations.
Continuing to inject into areas with lipodystrophy worsens the problem and affects medication absorption.
Injecting Too Close to the Navel
The 2-inch exclusion zone around your belly button exists for good reason. The navel area has different tissue structure, less subcutaneous fat, and more nerve sensitivity. Respect this boundary strictly.
When in doubt about whether a spot is close to your navel, choose a different location further away.
Not Relaxing the Injection Area
Tensed muscles make injections more painful. Whatever site you’re using, consciously relax that area before inserting the needle. Take a few deep breaths, release tension in your body, and ensure the injection site muscles are soft and relaxed.
This is especially important for the abdomen, where many people unconsciously tense their core muscles when approaching their stomach with a needle.
Injecting at the Wrong Angle
Ozempic should be injected at a 90-degree angle (straight in) to your skin, not at an angle. Angled injections may not reach proper subcutaneous depth or might cause medication to track back along the needle path.
Position the pen perpendicular to your skin surface before inserting the needle.
Injection Site Reactions and Management
Understanding normal reactions versus concerning problems helps you respond appropriately.
Normal Site Reactions
Mild redness at the injection site that resolves within hours is normal. Slight swelling (a small raised area) immediately after injection that disappears within a day is also expected.
Minor itching at the injection site, small bruises (especially if you hit a tiny capillary), and slight tenderness when touching the injection area for a day or two after injection are all normal reactions that don’t require treatment.
These reactions should be minimal and short-lived. If they’re severe or persistent, something isn’t right.
When to Be Concerned
Contact your healthcare provider if you experience increasing redness that spreads from the injection site, warmth at the site that persists beyond a few hours, swelling that worsens over 24 hours rather than improving, pus or drainage from the injection site, or red streaks extending from the injection area.
These symptoms suggest possible infection, though infection from properly administered injections is quite rare. Still, any concerning site reaction warrants medical evaluation.
Severe allergic reactions at injection sites (large hives, severe itching, rapid swelling) are uncommon but require immediate medical attention. This differs from mild, localized reactions that resolve quickly.
Managing Minor Discomfort
If an injection site is mildly sore, applying a cool compress for a few minutes can help. Don’t apply ice directly to skin; use a cloth barrier.
For small bruises, they’ll resolve on their own within a week. You can speed resolution slightly by applying warm compresses after the first 24 hours (use cool compresses in the first 24 hours to minimize bruising development).
Taking over-the-counter pain medication like acetaminophen can help if injection site discomfort is bothering you, though this is rarely necessary with proper technique.
Reducing Reaction Frequency
Letting medication reach room temperature before injection significantly reduces site reactions. Cold medication causes more discomfort and irritation.
Ensuring the alcohol has completely dried before injection also helps. Wet alcohol stings and can cause irritation.
Using fresh needles for every injection and following proper sterile technique minimizes infection risk and reduces site trauma.
Site Selection for Specific Situations
Certain circumstances might influence which injection site works best.
During Exercise and Physical Activity
Active individuals might want to avoid injecting in areas that will experience friction or pressure during upcoming activities. For example, if you’re planning a long run, injecting in your thigh might cause soreness during the run. Injecting in your abdomen might be more comfortable for that activity.
Conversely, if you’re doing activities that put pressure on your abdomen (certain weightlifting movements, yoga poses, or cycling), the thigh might be preferable for that week.
Time your injection relative to planned activities. Injecting the evening after your workout rather than immediately before can help minimize activity-related site discomfort.
While Traveling
When traveling, consider convenience and accessibility. The abdomen remains easiest for self-injection in varied settings like hotel rooms or airplane bathrooms.
Pack your medication properly with proper temperature control, and maintain your regular injection schedule based on your home time zone or adjusted appropriately for major time changes. Our guide to injecting Ozempic covers travel considerations more thoroughly.
With Clothing Considerations
Some people prefer to avoid injecting in areas that will be exposed or visible shortly after injection, though visible marks are usually minimal.
If you’re wearing tight waistbands or belts, you might prefer injecting in your thigh to avoid pressure over the injection site from clothing. Conversely, if you’re wearing shorts or a bathing suit, you might prefer abdominal injection to avoid potentially visible marks on exposed thighs.
These are minor considerations, but for some people, they affect site selection comfort and preference.
Temperature Extremes
In very hot weather when wearing minimal clothing, you might prefer injection sites that remain covered. In cold weather when exposing skin is uncomfortable, you might choose sites that are easiest to access quickly without undressing significantly.
The abdomen is typically easiest to access regardless of weather, requiring only lifting a shirt briefly.
Frequently Asked Questions
Can I inject Ozempic in the same spot every week?
No, you should never inject Ozempic in the same spot every week. Repeated injections in the exact same location cause lipodystrophy, where the fatty tissue changes structure, creating lumps or indentations. These tissue changes affect how your body absorbs medication and can reduce treatment effectiveness. You must move your injection site at least 1 inch away from your previous injection location each week. This rotation gives each area time to heal between injections and ensures consistent medication absorption. Many people develop a systematic rotation pattern within their preferred body region, cycling through different areas and returning to each spot only after several weeks of recovery time.
Does it matter which side of my body I inject on?
No, left versus right doesn’t matter medically. Your left abdomen and right abdomen are equivalent injection sites, as are your left thigh and right thigh. However, using both sides of your body doubles your available rotation options. Some people naturally alternate sides each week (left abdomen week one, right abdomen week two), while others stay on one side for multiple weeks before switching. The important factor is moving the specific injection location, not which side of your body you’re using. Choose based on comfort, convenience, and ensuring you’re rotating adequately within whatever area you select. If you’re right-handed, you might find it easier to inject on your left side and vice versa.
Can I inject Ozempic in my buttocks?
No, the buttocks is not an approved injection site for Ozempic. The FDA-approved sites are specifically the abdomen, thigh, and upper arm. While the buttocks has subcutaneous fat, it’s not included in the approved sites because it’s difficult to reach for self-injection and there’s less clinical data about absorption from that location. Stick to the three approved sites where absorption has been studied and verified. These sites provide plenty of rotation options without needing to use non-approved locations. If you’re struggling to find adequate injection sites among the approved options, discuss this with your healthcare provider rather than using unapproved locations.
What if I accidentally inject Ozempic into muscle?
If you accidentally inject Ozempic into muscle rather than subcutaneous fat, the medication may absorb faster than intended, though serious complications are unlikely. Intramuscular injection can be more painful than subcutaneous injection. The main concern is that altered absorption might affect how the medication works, though with Ozempic’s weekly dosing and long duration, occasional intramuscular injection is unlikely to cause significant problems. To prevent this, ensure you’re injecting in areas with adequate subcutaneous fat, use proper 90-degree angle technique, and consider pinching the skin if you’re quite lean. If you suspect you’ve injected into muscle and experience unusual symptoms, contact your healthcare provider.
Should I massage the injection site after injecting?
No, you should not massage or rub the injection site after injecting Ozempic. Rubbing the area can cause medication to disperse too quickly from the injection site, potentially affecting absorption. It can also increase bruising risk if you’ve hit a small blood vessel. After injecting and removing the needle, leave the area alone. If there’s any bleeding, apply gentle pressure with a clean tissue until it stops, but don’t rub or massage. The medication is designed to absorb slowly and steadily from the subcutaneous tissue without any manipulation. Simply let the injection site rest and heal naturally.
Can I inject Ozempic through a tattoo?
Yes, you can safely inject Ozempic through tattooed skin in most cases. Tattoos don’t affect medication absorption or create additional injection risks on healed tattoos. However, avoid injecting into fresh tattoos that are still healing, typically for 2 to 4 weeks after getting the tattoo. If you have raised or keloid scarring associated with a tattoo, choose a different injection site without scarring to ensure proper medication absorption. The vast majority of tattoos cause no issues with injection sites. Choose your injection location based on proper site selection criteria (adequate fat, at least 2 inches from navel, proper rotation from previous sites) rather than worrying about tattoos in those areas.
How far apart should weekly injection sites be?
Your weekly injection sites should be at least 1 inch apart, measured from the center of one injection site to the center of the next. One inch is roughly the width of your thumb, providing an easy way to estimate spacing. Many healthcare providers recommend spacing sites even further apart, 2 to 3 inches if possible, which gives tissues even more recovery time. The goal is to avoid repeatedly traumatizing the same tissue. If you’re using a systematic rotation pattern within a body region (like the abdomen), you might return to the same general area after 4 to 6 weeks, but you should select a slightly different specific spot within that area, still maintaining at least 1 inch from any previous injection location.
What if I develop a lump at my injection site?
If you develop a lump at your injection site, stop using that area immediately and avoid it for at least several weeks. The lump is likely lipohypertrophy, abnormal thickening of fat tissue caused by repeated injections in the same location. This condition affects medication absorption and can worsen if you continue injecting in that area. Rotate to other sites and give the lumpy area extended rest. Most lipohypertrophy improves slowly over weeks to months when you stop injecting there, though complete resolution can take longer. If a lump is painful, growing, red, warm, or otherwise concerning (rather than just a firm, painless area), contact your healthcare provider to rule out other problems like infection or abscess.
Can cold weather affect where I should inject?
Cold weather doesn’t change which sites are appropriate for injection, but it might affect convenience. In very cold weather when you’re wearing multiple layers of clothing, the abdomen might be more convenient because you can lift one layer briefly to access it. The thigh might require more undressing if you’re wearing pants, long underwear, and other layers. Some people find their hands are colder in winter, making it helpful to warm hands before handling the injection pen. The medication itself should be at room temperature for injection regardless of outdoor weather. Cold medication causes more discomfort, so let your pen sit at room temperature for 30 minutes before use, even in winter.
Should I avoid injection sites with stretch marks?
No, stretch marks don’t prevent safe injection. You can inject through areas with stretch marks without any issues. Stretch marks are simply scars in the skin from tissue expansion and don’t significantly affect the subcutaneous fat layer beneath where you’re injecting. The medication absorbs normally through areas with stretch marks. Many people have stretch marks on their abdomen or thighs (common injection sites), and these areas work perfectly well for Ozempic injection. Focus your site selection on having adequate subcutaneous fat, staying at least 2 inches from your navel, and rotating properly. The presence of stretch marks shouldn’t influence which sites you use.
Mastering Injection Site Selection and Rotation
Choosing the right injection site and rotating systematically are simple habits that significantly impact your success with Ozempic. The abdomen offers the easiest access and most consistent results for most people, but understanding all three approved sites gives you flexibility to manage various situations and maximize tissue recovery time.
The most important principle is consistent rotation, moving at least 1 inch from your previous injection site each week. This simple practice prevents lipodystrophy, ensures reliable medication absorption, and keeps your injection experience comfortable throughout months of treatment. Whether you rotate within a single body region or alternate between different areas, the systematic approach matters more than the specific pattern you choose.
Proper injection site selection combines with correct technique to maximize comfort and effectiveness. Using room-temperature medication, ensuring alcohol has dried, relaxing the injection area, and following proper pen operation all contribute to successful injections. Most people find that site selection becomes intuitive after the first few weeks, with rotation patterns developing naturally.
If you experience persistent problems with injection sites, unusual side effects, or have questions about your specific situation, consult your healthcare provider. They can provide personalized guidance based on your body composition, medical history, and individual response to treatment.
Whether you’re using brand-name Ozempic or compounded semaglutide at $199 monthly through TrimRx, proper injection site management is essential for achieving your weight loss goals. For those considering tirzepatide as an alternative, the same injection site principles apply. Get started with comprehensive medical support, clear instructions, and convenient online access to GLP-1 treatment that includes guidance throughout your journey.
Transforming Lives, One Step at a Time
Keep reading

Ozempic Alternatives: Your Options Compared
If Ozempic isn’t the right fit, whether because of cost, side effects, availability, or results, you have real alternatives. The closest ones are other…
Ozempic vs Wegovy: Same Drug, Different Purpose
Here’s the fact that surprises most people: Ozempic and Wegovy are the same medication (semaglutide), just sold under different brand names, at different doses,…

When Do “Ozempic Vulva” Changes Start and Stabilize? A Timeline
Vulvar and genital changes from GLP-1 weight loss follow the pace of your weight loss, so they typically begin within the first few months…

