How to Use Ozempic Pen: Complete Instructions with Pictures
You’ve just received your Ozempic prescription, and the pen device in your hand looks more complicated than you expected. There are dials, buttons, needles to attach, and a dose counter that you’re not quite sure how to read. You want to make sure you’re using it correctly because getting your dose right matters for both effectiveness and safety.
Here’s what you need to know: the Ozempic pen is designed to be user-friendly once you understand its components and operation. The pen is a pre-filled, multi-dose injector that delivers precise doses of semaglutide through a simple dial-and-click mechanism. While it might seem complex at first glance, the pen actually simplifies the injection process significantly compared to drawing medication from vials with syringes.
This guide provides complete instructions for using the Ozempic pen, from your first dose through refills and troubleshooting. We’ll walk through each component of the pen, explain what every click and symbol means, and cover common issues you might encounter. By the end, you’ll understand exactly how to operate your pen confidently and correctly.

Key Takeaways: Ozempic Pen Operation
- The Ozempic pen is a pre-filled, multi-dose device containing 2mg of semaglutide in 3mL of solution, providing doses for 6 weeks at 0.5mg or 4 weeks at 1mg.
- Each pen requires you to attach a new disposable needle before every injection and remove it immediately after to prevent contamination and air buildup.
- The dose selector dial turns with audible and tactile clicks, allowing you to select doses of 0.25mg, 0.5mg, 1mg, or 2mg depending on your prescription.
- A flow check (also called a safety test) must be performed before your first injection with a new pen and before each subsequent dose to ensure proper function.
- The dose counter window shows your selected dose before injection and counts down to 0 as you inject, confirming dose delivery.
- You must keep the dose button pressed and the needle inserted for at least 6 seconds after the counter reaches 0 to ensure complete dose delivery.
- The pen contains enough medication for multiple doses, but once opened, it expires after 56 days regardless of remaining medication.
- Common pen problems include difficulty turning the dose selector, inability to press the dose button fully, and air bubbles in the medication, all of which have straightforward solutions.
Understanding the Ozempic Pen Components
Before using your pen, familiarize yourself with its parts and how they work together.
The Pen Body
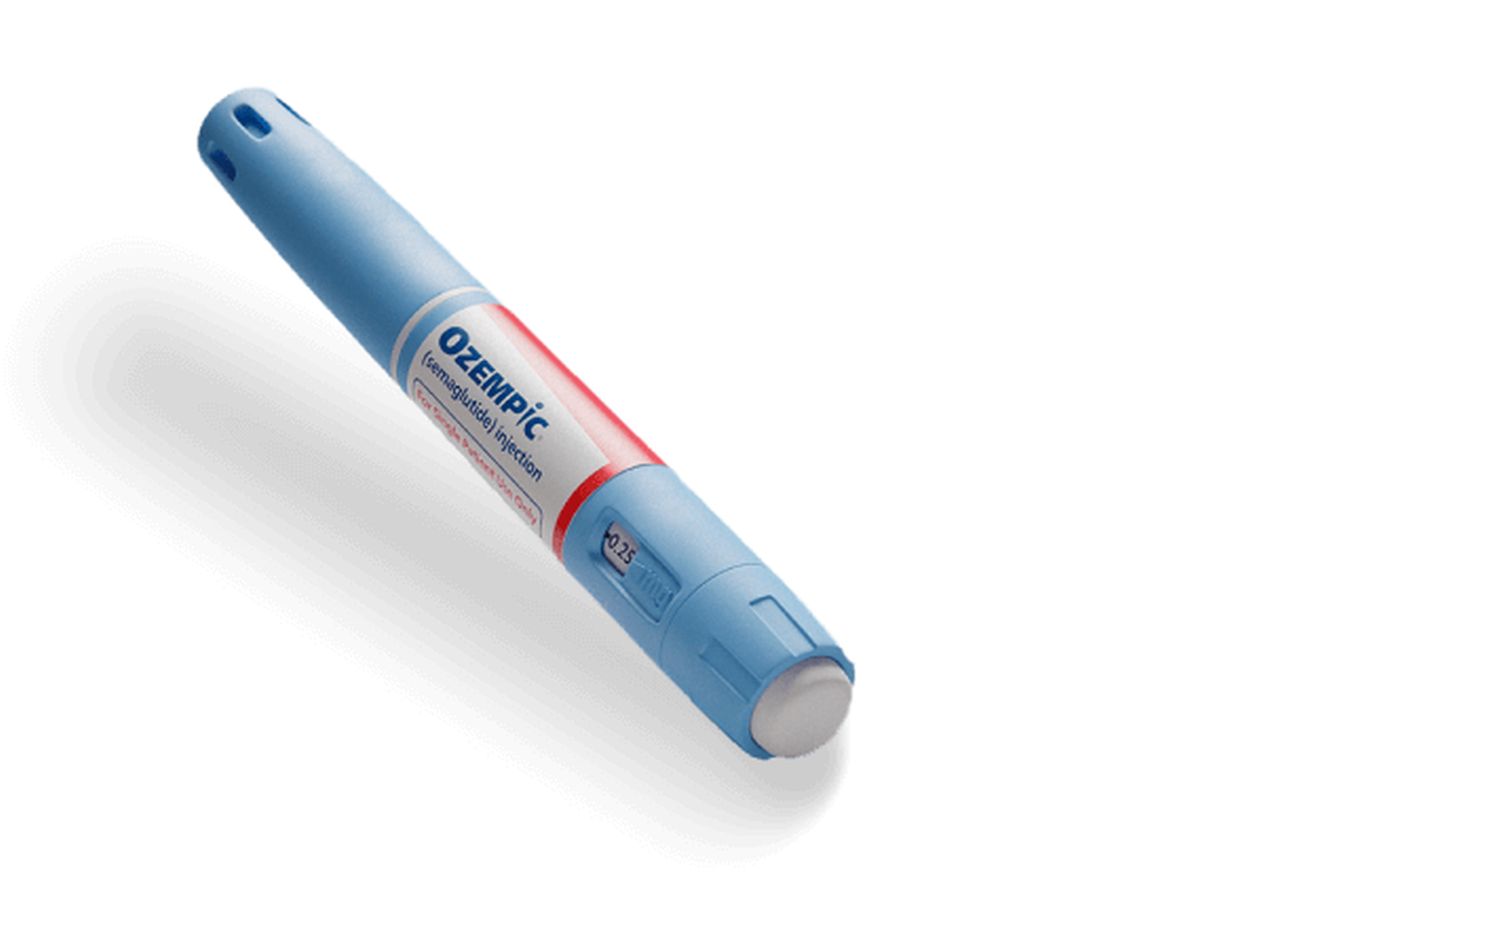
The main body of the pen is a cylindrical device about the size of a large marker. Inside is a glass cartridge containing 2mg of semaglutide medication in 3mL of solution. This cartridge is visible through a window in the pen body, allowing you to see the clear, colorless liquid inside.
The pen body has markings and a scale on it, but you don’t use these for dose measurement. The dose selector and dose counter handle all measurements for you.
Dose Selector
The dose selector is a dial at the bottom end of the pen that you turn to choose your dose. As you turn it, you’ll hear and feel clicks. Each click represents a dose increment. The selector only turns in one direction when selecting a new dose, but if you turn past your desired dose, you can turn it backward to correct.
The dose selector will only turn as far as the remaining medication in the pen allows. If you have less medication left than a full dose, the selector won’t turn to that full dose amount, indicating you need a new pen.
Dose Counter Window
The dose counter is a small window on the pen that displays numbers showing your selected dose. Before injection, it shows your dialed dose (0.25, 0.5, 1, or 2). During injection, you’ll see the numbers count down. After injection, it shows 0, confirming your dose was delivered.
Lines between the numbers indicate partial doses that you typically won’t use with standard Ozempic prescribing.
Dose Button
The dose button is a circular button at the end of the pen opposite the needle attachment point. After selecting your dose and inserting the needle into your injection site, you press and hold this button to deliver the medication. The button must be pressed firmly and held throughout the injection.
You’ll feel resistance when pressing the dose button. This is normal. Continue applying steady pressure until you hear a click and see the dose counter reach 0.
Needle Attachment Point
The top end of the pen has threading where you attach disposable pen needles. A removable pen cap protects this area and the medication when the pen isn’t in use. Always keep the cap on when not actively preparing for injection.
Pen Cap
The pen cap is a larger cover that slides over the entire top portion of the pen. It protects the needle attachment area and shields the medication from light. The cap clicks into place when properly secured and pulls straight off when you’re ready to use the pen.
Preparing Your Ozempic Pen for First Use
When you receive a new Ozempic pen, several preparation steps ensure it functions correctly.
Inspecting the Pen
Remove the pen from its packaging and check the label to confirm it’s Ozempic and that the expiration date hasn’t passed. Look through the cartridge window at the medication inside. Semaglutide should be clear and colorless, like water. If you notice any cloudiness, particles, discoloration, or if the solution appears frozen, don’t use the pen. Return it to your pharmacy for replacement.
Check that the pen isn’t damaged. Look for cracks in the cartridge, damage to the dose selector or button, or any other obvious defects that would prevent proper operation.
Warming to Room Temperature
If you’re taking the pen from the refrigerator for your injection, let it sit at room temperature for about 30 minutes before using it. Cold medication causes more discomfort during injection than room-temperature medication. Don’t try to speed this process using hot water, a microwave, or any heating device. Just let it sit on your counter.
This 30-minute wait applies to every injection, not just your first dose from a new pen.
Writing the In-Use Date
Once you use a pen for the first time, write the date on the pen label. Also calculate and write the disposal date, which is 56 days (8 weeks) later. For example, if you first use the pen on January 1st, write “In use: 1/1” and “Discard: 2/26.”
This tracking prevents you from using expired medication. After 56 days, the pen must be discarded even if medication remains inside.
Gathering Supplies
Before your first injection, gather everything you’ll need: the Ozempic pen, a package of pen needles (purchased separately from the pen), alcohol wipes, and a sharps container for disposing of used needles. Having everything ready makes the process smoother.
Attaching the Pen Needle
Every injection requires a fresh, sterile needle. Here’s how to attach it properly.
Choosing the Right Needle
Ozempic pen needles come in different lengths and gauges. Most commonly, you’ll use 32-gauge needles that are 4mm or 6mm long. The gauge (32G) indicates the needle thickness, with higher numbers meaning thinner needles. The length (4mm or 6mm) indicates how far the needle extends.
Most people use 4mm needles, which are long enough to reach the subcutaneous tissue layer but short enough to avoid accidentally injecting into muscle. Your healthcare provider or pharmacist can recommend the best needle length for you based on your body composition.
Removing Packaging
Take one needle from its packaging. The needle comes in a sealed, sterile package. Don’t remove it from this package until you’re ready to attach it to the pen, as this maintains sterility.
Peel back the paper seal to access the needle. You’ll see the needle has a plastic outer cap covering a rubber seal.
Attaching to the Pen
Remove your pen cap by pulling it straight off. Hold the pen in one hand with the needle attachment point facing up. With your other hand, push the needle (still in its outer cap) straight down onto the pen’s threading.
Once the needle is seated against the pen, twist it clockwise (to the right) until it feels secure. You don’t need to overtighten it. Just turn until it stops rotating easily and feels firmly attached, typically one to two full rotations.
Removing the Caps
The needle now has two caps that need to be removed before injection. First, carefully pull off and save the outer needle cap. This is the larger cap covering the entire needle. Set it aside in a clean place because you’ll need it after your injection to safely remove the needle from the pen.
Next, carefully pull off and discard the inner needle cap. This is a smaller cap directly over the needle itself. You’ll throw this away and won’t need it again.
Your needle is now exposed and ready for use. Be careful not to touch the needle or let it contact any surfaces, as this could introduce contamination.
Performing the Flow Check (Safety Test)
Before each injection, you must perform a flow check to verify the pen is working properly and to remove any air bubbles that could affect dose accuracy.
Why the Flow Check Matters
Air bubbles in the medication can prevent accurate dose delivery. The flow check pushes air out through the needle before your actual dose. Additionally, the flow check confirms that the pen mechanism is functioning correctly and that medication can flow through the needle.
This step is required before your very first dose with a new pen and before each subsequent injection. Skipping the flow check risks inaccurate dosing.
Setting the Flow Check Dose
With a new needle attached and both needle caps removed, turn the dose selector until the dose counter shows the flow check symbol or 0.25mg (depending on pen version). Some Ozempic pens show a specific flow check symbol that looks like a droplet, while others use 0.25mg as the flow check amount.
If your pen is already set to 0 (which happens after a previous injection), you’ll need to turn the selector slightly to reach the flow check setting.
Tapping Out Air Bubbles
Hold the pen with the needle pointing straight up toward the ceiling. Tap the side of the pen gently with your finger several times. You’ll likely see small air bubbles float to the top toward the needle. This tapping collects air at the highest point of the medication cartridge.
Continue tapping until no more bubbles rise to the top, typically 5 to 10 taps.
Pressing the Dose Button
Still holding the pen with the needle pointing up, press and hold the dose button all the way in until the dose counter shows 0. Keep holding until you see a drop of medication appear at the tip of the needle.
This drop confirms that medication is flowing properly and that air has been expelled. If you don’t see a drop appear, repeat the entire flow check process up to 6 times total. If no medication drop appears after 6 attempts, don’t use the pen. Contact your pharmacy for a replacement, as the pen is likely defective.
What If You Can’t Complete the Flow Check?
Occasionally, you might have difficulty getting medication to appear at the needle tip. Common causes include air pockets in the cartridge, a clogged or defective needle, or a pen malfunction.
If the flow check fails after multiple attempts with the same needle, try replacing the needle with a fresh one. Sometimes needles have manufacturing defects. If the flow check still fails with a new needle after 6 total attempts, the pen itself is faulty and needs replacement.
Selecting Your Dose
After completing the flow check, you’re ready to dial your prescribed dose.
Understanding Dose Options
The Ozempic pen can deliver doses of 0.25mg, 0.5mg, 1mg, or 2mg. Your healthcare provider prescribes a specific dose based on where you are in the semaglutide dosing schedule. Most people start at 0.25mg weekly for 4 weeks, then increase to 0.5mg, with possible increases to 1mg or 2mg based on response and tolerance.
Never adjust your dose without consulting your healthcare provider. The titration schedule exists to minimize side effects while building effectiveness.
Turning the Dose Selector
After your flow check (when the dose counter shows 0), turn the dose selector clockwise until the dose counter window displays your prescribed dose. You’ll hear and feel clicks as you turn. Count the clicks if that helps you track the selection.
The number of clicks between doses varies:
- From 0 to 0.25mg: X clicks
- From 0 to 0.5mg: X clicks
- From 0 to 1mg: X clicks
- From 0 to 2mg: X clicks
The exact number doesn’t matter as much as watching the dose counter window, which clearly shows your selected dose.
If You Turn Too Far
If you accidentally turn the selector past your intended dose, you can turn it counterclockwise (backward) to the correct number. The selector turns both directions, though it’s designed primarily for forward selection.
Don’t try to “use up” an accidentally selected higher dose by partially injecting it. Always correct the selector to your prescribed dose before injecting.
If the Selector Won’t Turn to Your Full Dose
The dose selector has a safety feature that prevents you from selecting a dose larger than the remaining medication in the pen. If your selector stops turning before reaching your prescribed dose, there isn’t enough medication left in the pen for a full dose.
Don’t try to force the selector. Use a new pen for your full dose. Don’t attempt to take a partial dose from the nearly empty pen combined with a partial dose from a new pen, as this makes accurate dosing very difficult and increases error risk.
Injecting Your Dose
With your dose selected and needle prepared, you’re ready to inject.
Choosing and Preparing the Injection Site
Ozempic can be injected in your abdomen (stomach area), thigh, or upper arm. The abdomen is most commonly used for self-injection. Choose a spot at least 2 inches away from your belly button and at least 1 inch from your last injection site. Our complete injection guide covers site selection and rotation in detail.
Clean your chosen injection site with an alcohol wipe, using circular motions from the center outward. Let the area air dry completely, typically 10 to 15 seconds. Injecting into wet alcohol stings unnecessarily.
Inserting the Needle
Hold the pen like you would hold a pencil or dart, with your thumb near the dose button but not pressing it yet. Position the needle at a 90-degree angle (straight) to your skin.
In one smooth, firm motion, push the needle straight into your skin until the needle is fully inserted. You don’t need to stab quickly or jab hard. A steady, confident push works best. The needle is short enough that “fully inserted” means the pen is close to your skin.
Most people feel a brief pinch or slight pressure during insertion, but the thin needle minimizes discomfort.
Pressing the Dose Button
Once the needle is fully inserted, press the dose button all the way down and hold it. You’ll feel resistance, which is normal. Keep applying steady pressure.
As you hold the button, watch the dose counter. The numbers will count down: 2, 1.5, 1, 0.5, 0 (if you started at 2mg, for example). The counting confirms that medication is being delivered.
You’ll hear and feel a click when the injection is complete and the dose counter reaches 0. This click indicates the pen mechanism has fully released.
The Critical 6-Second Wait
Here’s the most important step that many people initially forget: after the dose counter reaches 0 and you hear the click, continue holding the dose button down and keep the needle in your skin for at least 6 seconds. Count slowly: “one-one-thousand, two-one-thousand, three-one-thousand, four-one-thousand, five-one-thousand, six-one-thousand.”
This waiting period ensures complete dose delivery. The click means the injection mechanism has finished, but the medication needs a few additional seconds to fully enter your tissue. Removing the needle immediately causes some medication to leak back out, meaning you don’t get your full dose.
Some healthcare providers recommend counting to 10 seconds, especially for higher doses (1mg or 2mg). The extra time doesn’t hurt and provides additional assurance of complete delivery.
Removing the Needle
After counting to 6 (or 10), release the dose button and withdraw the needle from your skin using the same straight-out motion you used to insert it. Don’t twist or angle the needle during removal.
Check the dose counter one final time. It should show 0, confirming your complete dose was delivered. You might see a tiny drop of medication at the needle tip or at your injection site. This is normal and doesn’t mean you didn’t receive your full dose. The amount visible is typically far less than your actual dose.
If there’s any bleeding at your injection site, press gently with a clean tissue or gauze. Don’t rub the site, as this can cause unnecessary bruising. Most injections don’t cause any bleeding at all.
Removing and Disposing of the Needle
Safe needle handling after injection prevents injuries and contamination.
Recapping the Needle
Carefully place the outer needle cap (the one you saved earlier) over the exposed needle. Don’t try to recap the inner cap, as it’s too small and increases your risk of accidental needle sticks. Only recap using the larger outer cap.
Align the cap with the needle and push the needle into the cap until it’s fully covered. Some people find it easier to place the cap upright on a flat surface and guide the needle into it, rather than holding the cap in their hand.
Removing the Needle from the Pen
Once the outer cap is secured over the needle, unscrew the entire needle assembly from the pen by turning it counterclockwise (to the left). The capped needle will come off the pen completely.
Never leave a needle attached to the pen between injections. Leaving needles attached can cause air to enter the pen, potentially affecting dose accuracy for your next injection. It also increases contamination risk and could lead to medication leakage.
Proper Disposal
Immediately place the used needle (still in its outer cap) into a sharps container. Sharps containers are puncture-proof containers specifically designed for used needles and syringes. You can purchase them at pharmacies, medical supply stores, or online.
If you don’t have an official sharps container, use a thick plastic container with a screw-on lid, such as an empty laundry detergent bottle. Label it clearly: “Used Sharps – Do Not Recycle.” Never throw loose needles directly into household trash, as they pose injury risk to sanitation workers.
When your sharps container is about three-quarters full, seal it permanently and check your local regulations for disposal. Many pharmacies, hospitals, and community health centers offer sharps disposal services. Some areas have household hazardous waste collection days that accept sharps containers.
Replacing the Pen Cap
After removing the needle, put the pen cap back on your Ozempic pen. Push it on firmly until it clicks into place. This protects the needle attachment area and shields the medication from light.
Store your capped pen according to storage instructions. You can keep in-use pens in the refrigerator or at room temperature (below 86°F), whichever you prefer. Many people prefer room temperature storage for in-use pens since it eliminates the need to wait for warming before each injection.

Interpreting Pen Indicators and Displays
Understanding what your pen is telling you prevents confusion and dosing errors.
Dose Counter Readings
The dose counter is your primary source of information. Before injection, it shows your selected dose. During injection, it counts down to 0. After injection, it remains at 0 until you select your next dose.
If you see a number in the dose counter window that you didn’t intentionally select, the dose selector has been turned. Before injecting, always verify the displayed dose matches your prescription.
Remaining Medication Indicator
The dose selector itself indicates how much medication remains in your pen. The selector won’t turn beyond the amount of medication left. If your prescribed dose is 1mg but the selector only turns to 0.5mg, you have less than a full 1mg dose remaining and need a new pen.
You can also visually check the medication level by looking through the cartridge window on the pen body, though this is less precise than using the dose selector as your guide.
End-of-Content Indicator
Some pen versions have visual indicators when the pen is nearly empty, though the inability to select your full dose is the clearest signal. Don’t try to use partial doses from a nearly empty pen combined with partial doses from a new pen. Always take your full dose from a single pen.
Click Feedback
The pen provides audible and tactile clicks at several points: when turning the dose selector (each click represents a dose increment), when the dose button reaches full depression during injection (click indicates completion), and when attaching or removing needles (clicks confirm proper threading). These clicks help you operate the pen correctly without constantly looking at it.
If you don’t hear expected clicks or the pen’s operation feels different than usual (too easy, too hard, grinding sensation), something may be wrong with the pen mechanism. Don’t force it. Contact your pharmacy for guidance.
Troubleshooting Common Pen Problems
Even with proper use, you might encounter occasional issues. Most have straightforward solutions.
Dose Selector Won’t Turn or Turns Too Easily
If the dose selector feels stuck and won’t turn, first check whether a needle is attached. Some pen malfunctions occur when trying to select a dose with a needle already on the pen, though this shouldn’t happen with proper design. Remove any attached needle and try again.
If the selector still won’t turn, the pen mechanism may be jammed or broken. Don’t force it. Contact your pharmacy for a replacement pen.
Conversely, if the selector turns with no resistance or doesn’t click distinctly at each dose increment, the pen mechanism may be damaged. This could result in inaccurate dosing, so use a different pen and report the issue to your pharmacy.
Can’t Press the Dose Button Fully
If you can’t press the dose button all the way down, several causes are possible. Most commonly, you haven’t inserted the needle fully into your skin. Make sure the needle is completely inserted before pressing the button.
Another possibility is that the dose selector is between click marks rather than precisely on a dose increment. The pen prevents dose button operation when the selector isn’t properly aligned with a specific dose. Turn the selector slightly forward or backward until it clicks precisely into a dose position.
If you’ve selected a dose larger than the medication remaining in the pen, the button may not press fully. Turn the selector to a smaller dose that doesn’t exceed remaining medication.
Rarely, pen mechanism failure can prevent proper button operation. If none of the above solutions work and the button simply won’t depress with a properly attached needle and correctly selected dose, the pen is defective. Use a different pen and return the faulty one to your pharmacy.
Air Bubbles in the Medication
Small air bubbles in the medication cartridge are normal and not harmful. The flow check before each injection removes air from the needle and uppermost portion of the cartridge. Larger air pockets can potentially affect dose accuracy, which is why the flow check is required.
If you notice large air bubbles even after performing the flow check correctly, try the flow check again. Sometimes it takes two or three flow checks to clear substantial air, especially when first using a new pen.
Air typically enters pens when needles are left attached between uses, which is why you must remove the needle immediately after each injection. Air can also enter through temperature changes or rough handling.
Medication Leaks from the Pen
If you notice medication leaking from the needle attachment area, first check that no needle is currently attached. Leakage with a needle attached usually means the needle isn’t screwed on tightly enough. Remove it, attach a fresh needle, and ensure it’s secure.
Leakage without a needle attached indicates a cracked cartridge or damaged seal. Stop using that pen immediately and get a replacement from your pharmacy. Don’t attempt to use a pen with visible damage or leakage, as you can’t accurately dose from it.
Sometimes people confuse the small drop of medication that appears during the flow check or at the needle tip after injection with a leak. These tiny amounts are expected and normal, not leaks requiring pen replacement.
Pen Display Shows No Numbers
If the dose counter window appears blank or you can’t see any numbers, check that you’re looking at the correct window. The dose counter is typically near the bottom of the pen body.
If the correct window appears completely blank even when you turn the dose selector, the pen may have a display malfunction. Verify by checking if the dose selector clicks as you turn it. If it clicks normally but shows no display, the pen has a defect and needs replacement.
Needle Breaks During Injection
Needle breaks are extremely rare with modern pen needles but can happen if the pen is bumped or dropped during injection or if you twist the needle while it’s in your skin. If a needle breaks with part remaining in your skin, don’t panic. Apply pressure to stop any bleeding and contact your healthcare provider immediately for guidance on safe removal.
To prevent breaks, stay still during injection, keep the pen steady, and remove the needle using a straight pulling motion without twisting.
Storing Your Ozempic Pen Correctly
Proper storage maintains medication effectiveness throughout the pen’s 56-day in-use life.
Unopened Pen Storage
Store unopened Ozempic pens in the refrigerator at 36°F to 46°F (2°C to 8°C). Keep them in their original carton to protect from light. Don’t store pens in the freezer or in the coldest part of your refrigerator where they might freeze. Frozen medication must be discarded, even after thawing.
Unopened pens remain usable until the expiration date printed on the label, as long as they stay refrigerated.
In-Use Pen Storage
After first use, you can store the pen either in the refrigerator or at room temperature below 86°F (30°C). Many people prefer room temperature for in-use pens because:
- No waiting for the pen to warm before injection
- More convenient for travel
- Easier to remember weekly doses when the pen is visible on the counter
If you choose room temperature storage, keep the pen away from direct sunlight, heat sources, and temperature extremes. Don’t leave it in a hot car or near a window where sunlight hits directly.
Regardless of storage temperature, in-use pens expire 56 days after first use. Mark your disposal date clearly on the pen label.
Pen Cap Importance
Always keep the pen cap on when not actively preparing an injection. The cap protects the needle attachment area from contamination and shields the medication from light exposure, which can degrade semaglutide over time.
Travel Considerations
When traveling, keep your Ozempic pen in carry-on luggage, never checked bags. Checked luggage compartments can get too cold (potentially freezing medication) or too hot. In-use pens can stay at room temperature throughout travel, making them convenient for trips.
If you’re traveling somewhere hot, consider using a medication cooler bag with ice packs (not direct ice, which could freeze the medication). These bags maintain appropriate temperature ranges without refrigeration.
When to Replace Your Pen
Knowing when to start a new pen prevents gaps in treatment and ensures medication effectiveness.
After 56 Days
Discard your pen 56 days after first use, even if medication remains. The medication’s stability and effectiveness aren’t guaranteed beyond this timeframe once the pen has been opened and used. The date tracking you did when first using the pen tells you exactly when disposal is required.
When Medication Is Depleted
If you use the pen until the dose selector won’t turn to your prescribed dose anymore, that pen is effectively empty even if you can see a small amount of liquid remaining. The pen is designed to prevent selection of incomplete doses. Start a new pen for your next injection.
Don’t try to extract remaining medication using syringes or other methods. The pen is designed as an integrated system, and bypassing its mechanisms can lead to contamination or dosing errors.
If the Pen Is Damaged
Discontinue use immediately if your pen is cracked, dropped hard enough to suspect internal damage, frozen, left in excessive heat (over 86°F for extended periods), or otherwise compromised. Even if it still operates, damaged pens may not dose accurately.
If Medication Appears Abnormal
Discard the pen if the medication looks cloudy, discolored, contains particles, or has changed appearance in any way. Semaglutide should always be clear and colorless, like water. Any change indicates the medication has degraded and shouldn’t be used.
Understanding Ozempic Pen Versions
Novo Nordisk produces different versions of Ozempic pens with slightly different features, though the basic operation remains consistent.
Standard Ozempic Pen
The most common version contains 2mg of semaglutide in 3mL of solution and can deliver doses of 0.25mg, 0.5mg, 1mg, or 2mg. This pen provides multiple doses depending on your prescribed strength: 8 doses at 0.25mg, 6 doses at 0.5mg, 3 doses at 1mg, or 2 doses at 2mg.
Pen Variations by Market
Some international markets have different pen designs or different dose options. If you obtained your Ozempic from outside the United States, the pen operation might differ slightly from descriptions here. Check the patient information leaflet that came with your specific pen for precise instructions.
Future Pen Innovations
Pharmaceutical companies continually work on improving pen technology. Future versions might include features like digital dose tracking, connectivity to smartphone apps, or modified needle designs. Always follow the specific instructions provided with your pen rather than assuming all Ozempic pens operate identically.
Comparing Pen Delivery to Vial and Syringe
Understanding how pen delivery compares to traditional vial-and-syringe methods helps you appreciate the pen’s benefits and understand alternatives.
Pen Advantages
Pre-measured doses eliminate the need to draw up medication yourself, reducing dosing errors. The pen mechanism delivers consistent, accurate doses every time. The device is more portable and discreet than carrying vials and syringes. Dose selection and delivery are simpler, requiring less training and dexterity.
The pen’s integrated design also maintains medication sterility better than repeatedly accessing a vial with different syringes.
Pen Disadvantages
Pens cost more than equivalent medication in vials, though insurance coverage often makes this irrelevant to patients. Brand-name Ozempic costs approximately $969 per month whether in pen or vial form, but compounded semaglutide at $199 monthly through TrimRx comes in vials requiring syringes since compounding pharmacies don’t manufacture pens.
Pens also have less dose flexibility. You can only select the specific dose increments the pen offers (0.25mg, 0.5mg, 1mg, 2mg), while vials allow any dose to be drawn up, potentially useful for customized dosing schedules.
The pen’s 56-day in-use expiration can lead to medication waste if you don’t use it frequently enough. Vials have similar limitations but sometimes different expiration timeframes depending on the specific formulation.
When You Might Use Vials Instead
If you’re using compounded semaglutide, you’ll work with vials and syringes since pens aren’t available for compounded versions. Some people also prefer vials because they can visually confirm exactly how much medication they’re drawing up, providing extra reassurance about dose accuracy.
Healthcare providers might prescribe vial formulations if your insurance covers vials but not pens, or if you require a dose that doesn’t align with pen increments.
The injection technique itself is nearly identical whether using a pen or syringe. Both deliver subcutaneous injections to the same body sites. The primary difference is in dose preparation rather than injection administration.
Frequently Asked Questions
Can I reuse pen needles on my Ozempic pen?
No, you should never reuse pen needles. Each needle is designed for single use only and must be disposed of after each injection. Reusing needles causes them to become dull, making subsequent injections more painful. Used needles can harbor bacteria, increasing your risk of infection at injection sites. Reused needles can also develop bent or damaged tips that affect medication delivery accuracy. Additionally, leaving needles on the pen between uses allows air to enter, potentially affecting your next dose. Always use a fresh, sterile needle for each weekly injection and dispose of used needles immediately in a sharps container.
How do I know if my Ozempic pen is empty?
Your Ozempic pen will prevent you from selecting a dose larger than the medication remaining. If you try to turn the dose selector to your prescribed dose and it stops turning before reaching that number, you don’t have enough medication left for a full dose. For example, if your prescribed dose is 1mg but the selector only turns to 0.5mg and then stops, the pen doesn’t contain a full 1mg dose. This is the clearest indicator that you need a new pen. You can also look through the cartridge window at the medication level, though this visual check is less precise than using the dose selector as your guide.
What should I do if I drop my Ozempic pen?
If you drop your Ozempic pen, first check it carefully for visible damage, including cracks in the cartridge window, damage to the dose selector or button, or leakage of medication. If you see any damage, don’t use the pen and obtain a replacement from your pharmacy. If there’s no visible damage, perform a flow check before your next injection to verify the pen still functions correctly. If the flow check works normally and you see a medication drop at the needle tip, the pen is likely fine to continue using. However, if you dropped the pen hard onto concrete or from significant height, consider replacing it even without visible damage, as internal components may have been compromised.
Can I adjust the Ozempic pen dose without doctor approval?
No, you should never adjust your Ozempic dose without consulting your healthcare provider. The dosing schedule for semaglutide is carefully designed to minimize side effects while building effectiveness. Most people start at 0.25mg for 4 weeks, then increase to 0.5mg, with potential increases to 1mg or 2mg based on individual response and tolerance. Increasing your dose too quickly can cause severe side effects like nausea and vomiting. Staying at a lower dose than prescribed may not provide optimal weight loss results. Always follow your prescribed dose exactly and discuss any desire to change doses with your healthcare provider, who can make adjustments safely based on your progress and side effect experience.
Why does my Ozempic pen make clicking sounds?
Clicking sounds from your Ozempic pen are normal and actually serve important functions. You’ll hear clicks when turning the dose selector, with each click representing a dose increment. This audible feedback helps you count as you dial to your prescribed dose, even if you’re not looking directly at the dose counter. You’ll also hear a click when the dose button reaches full depression during injection, indicating the injection mechanism has completed delivery. These clicks, combined with tactile feedback you can feel, help ensure proper pen operation. If you don’t hear the expected clicks, or if they sound different than usual (grinding, skipping), contact your pharmacy, as this might indicate a pen malfunction.
How long does an Ozempic pen last once opened?
An Ozempic pen lasts exactly 56 days (8 weeks) after you first use it, regardless of how much medication remains inside. This timeframe applies whether you store the in-use pen in the refrigerator or at room temperature. The medication’s stability and effectiveness cannot be guaranteed beyond 56 days once the pen seal has been broken. You must discard the pen after this period even if you can see medication left inside. This is why it’s crucial to write the first-use date and the disposal date on your pen label immediately after your first injection. The 56-day expiration is separate from the printed expiration date, which applies only to unopened pens stored properly in the refrigerator.
What if I can’t see the numbers in my Ozempic pen dose counter?
If you have difficulty seeing the numbers in the dose counter window, try holding the pen in better lighting or looking at it from a slightly different angle. The dose counter is typically located near the bottom of the pen, and the numbers should be clearly visible when properly illuminated. If the window appears completely blank or foggy even in good lighting, the pen may have a display defect and should be replaced. Some people with vision difficulties find it helpful to use the clicking sounds when selecting doses, with each click representing a dose increment from your starting point. If vision problems make using the pen consistently difficult, discuss alternative options with your healthcare provider, such as having someone assist with dose verification or exploring other medication delivery methods.
Can I take my Ozempic pen on an airplane?
Yes, you can and should take your Ozempic pen on airplanes in your carry-on luggage. Never pack it in checked baggage, as cargo hold temperatures can get too cold (potentially freezing your medication) or too hot. The TSA allows medically necessary medications, including injectable medications, to travel in carry-on bags. Keep your pen in its original packaging with the prescription label visible. You can also bring pen needles and a sharps container. While not usually required, some people bring a letter from their healthcare provider explaining their need for injectable medication, especially for international travel. The medication can stay at room temperature throughout your travel since in-use pens don’t require refrigeration.
What happens if I press the dose button before inserting the needle?
If you accidentally press the dose button before inserting the needle into your skin, the medication will be expelled from the needle into the air, and you’ll lose that dose. The dose counter will count down to 0, indicating the dose has been delivered, even though it didn’t go into your body. Don’t try to redial the same dose and inject it, as this would double your dose (the pen has already “used” that medication, even though it went into the air). Instead, make a note of what happened and contact your healthcare provider for guidance. Depending on your dosing schedule and where you are in treatment, they might advise waiting for your next scheduled dose or have you take a replacement dose after a certain period. This is an important reason to stay focused during the injection process and ensure the needle is fully inserted before touching the dose button.
How can I tell if my Ozempic pen medication has gone bad?
Semaglutide should always be clear and colorless, looking like water. Check your medication through the pen’s cartridge window before each injection. Signs that medication has gone bad include cloudiness, any color tint (yellow, brown, or other discoloration), visible particles floating in the solution, or a frozen appearance. If you notice any of these changes, don’t use the pen. Return it to your pharmacy for a replacement. Medication can degrade if exposed to extreme temperatures (freezing or excessive heat above 86°F), direct sunlight, or if stored beyond its expiration date. Proper storage in the refrigerator for unopened pens and appropriate temperature control for in-use pens helps maintain medication quality throughout the 56-day in-use period.
Mastering Your Ozempic Pen
The Ozempic pen might seem complex when you first open the box, but it’s designed to make self-injection as simple and foolproof as possible. The dial-and-click mechanism provides both visual and audible confirmation of proper operation. The dose counter ensures you always know exactly how much medication you’re taking. The pre-filled cartridge eliminates measurement errors. After just a few uses, the operation becomes routine.
Success with the Ozempic pen comes down to following a consistent process: attach a fresh needle, perform the flow check, select your prescribed dose, inject carefully, and count to 6 before removing the needle. Rotating your injection sites and tracking your 56-day pen expiration ensures continued effectiveness throughout treatment. If you encounter any problems that these troubleshooting tips don’t resolve, contact your healthcare provider or pharmacist for guidance.
Understanding your pen’s operation is just one part of effective semaglutide treatment for weight loss. The medication works best when combined with appropriate nutrition and physical activity changes. Many people also benefit from understanding common side effects like nausea and strategies to manage them effectively.
Whether you’re using brand-name Ozempic pens or compounded semaglutide at $199 monthly through TrimRx, proper injection technique maximizes your results while minimizing discomfort and complications. Get started with comprehensive medical support, clear instructions, and convenient online access to semaglutide treatment that includes guidance throughout your weight loss journey.
Transforming Lives, One Step at a Time
Keep reading
Online Ozempic Prescription Texas
You can get an Ozempic prescription online in Texas through a licensed telehealth provider without an in-person visit. Texas telehealth law allows providers to…

Online Ozempic Prescription California
You can get an Ozempic prescription online in California through a licensed telehealth provider without an in-person visit. California’s telehealth laws allow providers to…

Weight Loss Clinic Online Texas: Your Options
An online weight loss clinic in Texas gives you access to GLP-1 medications like semaglutide and tirzepatide through a fully virtual process. You complete…

